Hey there! I want to share an interesting project we recently completed – a garage conversion that really showcases the versatility of mini split systems. With 11 years in HVAC and specialized experience with mini splits, I love showing how these systems can solve unique cooling and heating challenges.
The Project Overview
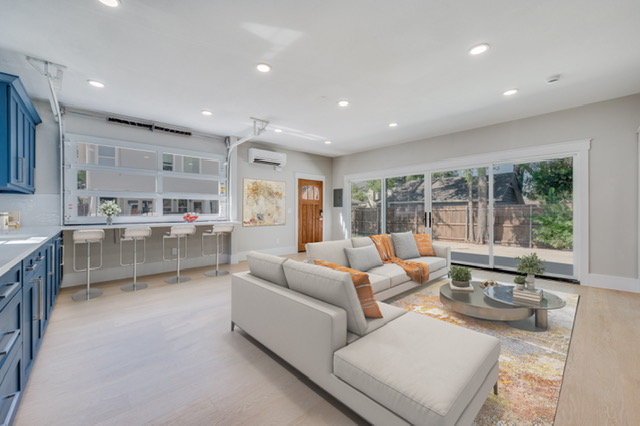
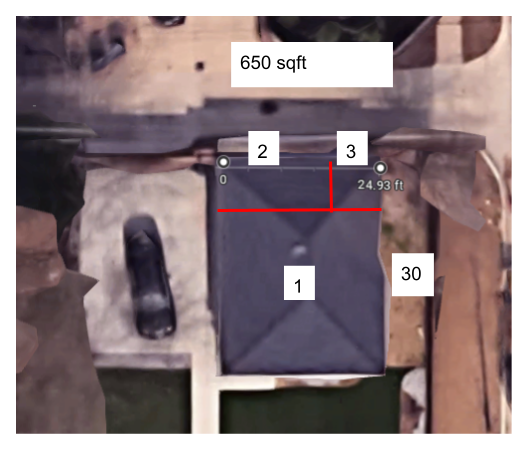
A contractor approached us about conditioning a 650-square-foot garage conversion – a project that immediately reminded me of several similar conversions we’ve handled over the years. The space was being transformed into a pool guest house with three distinct areas:
- A main open living area designed for entertaining and relaxing
- A small bedroom/office space for overnight guests or remote work
- A bathroom with modern amenities
This layout was quite similar to a guest house project we completed last year, where we also faced the challenge of cooling multiple rooms with a single system. In that previous project, we learned some valuable lessons about air distribution and temperature management that would prove crucial for this conversion.
Initially, the contractor was considering a traditional HVAC system – a common approach I’ve seen many contractors default to. Their reasoning usually centers around familiarity with conventional systems and concerns about conditioning multiple rooms. However, based on my experience with over 50 similar conversions, I knew a mini split would be the perfect solution, especially given the space’s unique characteristics and intended use.
I’ve found that pool houses and garage conversions have specific requirements that mini splits are uniquely suited to handle:
- They need flexible temperature control for irregular usage patterns
- They often have to combat high humidity from pool proximity
- They require efficient operation since they’re typically not used continuously
- They benefit from quiet operation to maintain a peaceful environment
In our previous guest house installation -see blog Wall Mount Mini Split Installation: A Guest House Case Study , we discovered that proper insulation combined with strategic unit placement could effectively maintain comfortable temperatures throughout multiple rooms, even without dedicated air handlers in each space. This experience gave me confidence in recommending a similar approach for this project.
Let me walk you through our thought process and how we made it work, incorporating these lessons learned from past projects. The key was to focus on three critical elements that I’ve found make or break these conversions: proper sizing, strategic placement, and optimized air flow patterns.
Exploring Our Options
We actually considered two different approaches for this project:
- The Ducted Mini Split Option
- We looked at installing a Mitsubishi PEAD ducted slim-style unit in the attic
- The plan was to run two ducts to the main living area and one each to the smaller rooms
- This would have provided even air distribution throughout all spaces
- It was a solid option since we had available attic space
- The Wall-Mounted Solution
- This became our final choice to help keep costs down
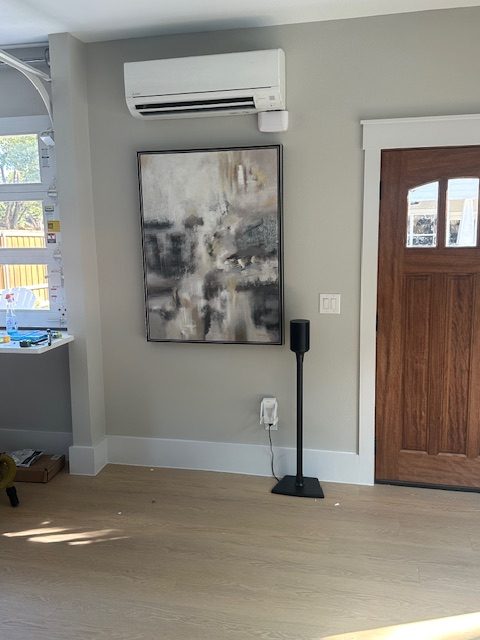
- We selected a 1.25-ton Mitsubishi MSZ-GL15NA wall mount unit paired with a MUZ-GL15N condenser
- The challenge was ensuring proper air distribution across multiple rooms
Why We Chose the Wall Mount (And How We Made It Work)
The key to making a wall-mounted unit work in a multi-room setup is strategic placement. We installed the unit on the wall adjacent to the pool area, allowing it to blow air toward the bedroom/office space and bathroom. Now, you might be thinking – “Won’t the back rooms be too warm?” Here’s why it worked:
- The smaller rooms only needed about 40-50 CFMs of air flow
- The bedroom/office wasn’t large enough for a bed, so the door would typically stay open
- The contractor used spray foam insulation in the walls and roof deck, creating an extremely efficient envelope
- The system’s ability to run continuously at low velocity helps maintain even temperatures
Real-World Performance
The proof is in the performance! Even during 95°F days with contractors working and doors opening frequently, the system maintained a comfortable 72°F throughout the space. The spray foam insulation played a huge role in this success, minimizing heat gain even during 100°F+ days.
Key Design Considerations
For anyone considering a similar project, here are the crucial factors we considered:
- Outdoor Unit Location: Always your first consideration – make sure you have a viable spot that meets clearance requirements and accessibility needs
- Indoor Unit Placement: Critical for proper air distribution, especially in multi-room setups
- Power Requirements: In our case, the complete renovation made electrical work straightforward
- Condensate Drainage: We needed to use a condensate pump since we couldn’t drain directly outside due to the turf and high-traffic area near the pool
- Air Flow Management: We installed a bathroom fan that could run continuously if needed, though we found the wall mount unit provided sufficient air distribution on its own
The Final Result
The project turned out to be a perfect example of how a well-designed mini split system can effectively condition a converted space. While we initially installed a booster fan for the bedroom area, we discovered it wasn’t necessary – the main unit handled the entire space beautifully.
This project reinforced something I’ve learned over my years in the business: proper insulation combined with strategic mini split placement can create remarkably comfortable spaces, even in challenging multi-room configurations.
Have you got a garage conversion project in mind? Or maybe you’re curious about how a mini split might work in your space? Feel free to reach out with questions – I love helping people find solutions that combine comfort, efficiency, and style. Mini splits are versatile and can fit almost any space—let’s explore what works best for your project!
